

FAQs
A new Look & Feel in Blackboard
Blackboard’s ‘homepage’ is getting a new look. Blackboard courses, course functions and workflows remain unchanged. After you log in to Blackboard, you will see that the Blackboard landing page looks different. All modules are gone and a new streamlined menu called Ultra Base Navigation (UBN) appears on the left.
For teachers and students:
Some information that was previously accessible via the login page and the My Blackboard landing page is now in the left column of the page.
The Institution Page is the first button in the UBN menu. The interface provides simplified tools for Instructors to focus on student performance (i.e. activity flows, calendar due dates and it introduces course layering).
Via the Grades button, teachers know, for example, for all courses where they are teachers, which students have handed in assignments, which students are late, etc.
Students can browse news feeds of the courses in the activity stream and click directly to course activities.
- Do my courses still look the same?
The courses still look exactly the same with the transition to the new navigation structure.
However, along with the transition to the Ultra Base navigation, a new release has also taken place. This means that one adjustment has been made in your courses. Submitting assignments looks a little different than you are used to.
Here you can see what this change means and how you can now submit your assignments.
- Where do I adjust my notifications?
Notifications have been reset to default with the transition to Ultra Base Navigation. So you will have to set this again. You can indicate which types of notifications you want to receive and how. You can also indicate what you want to receive an email for, for example.
The user will find an overview of all notifications on his personal page. The page with your own name in the main menu. You can find the notification settings under Global Notification Settings, click on the pencil:
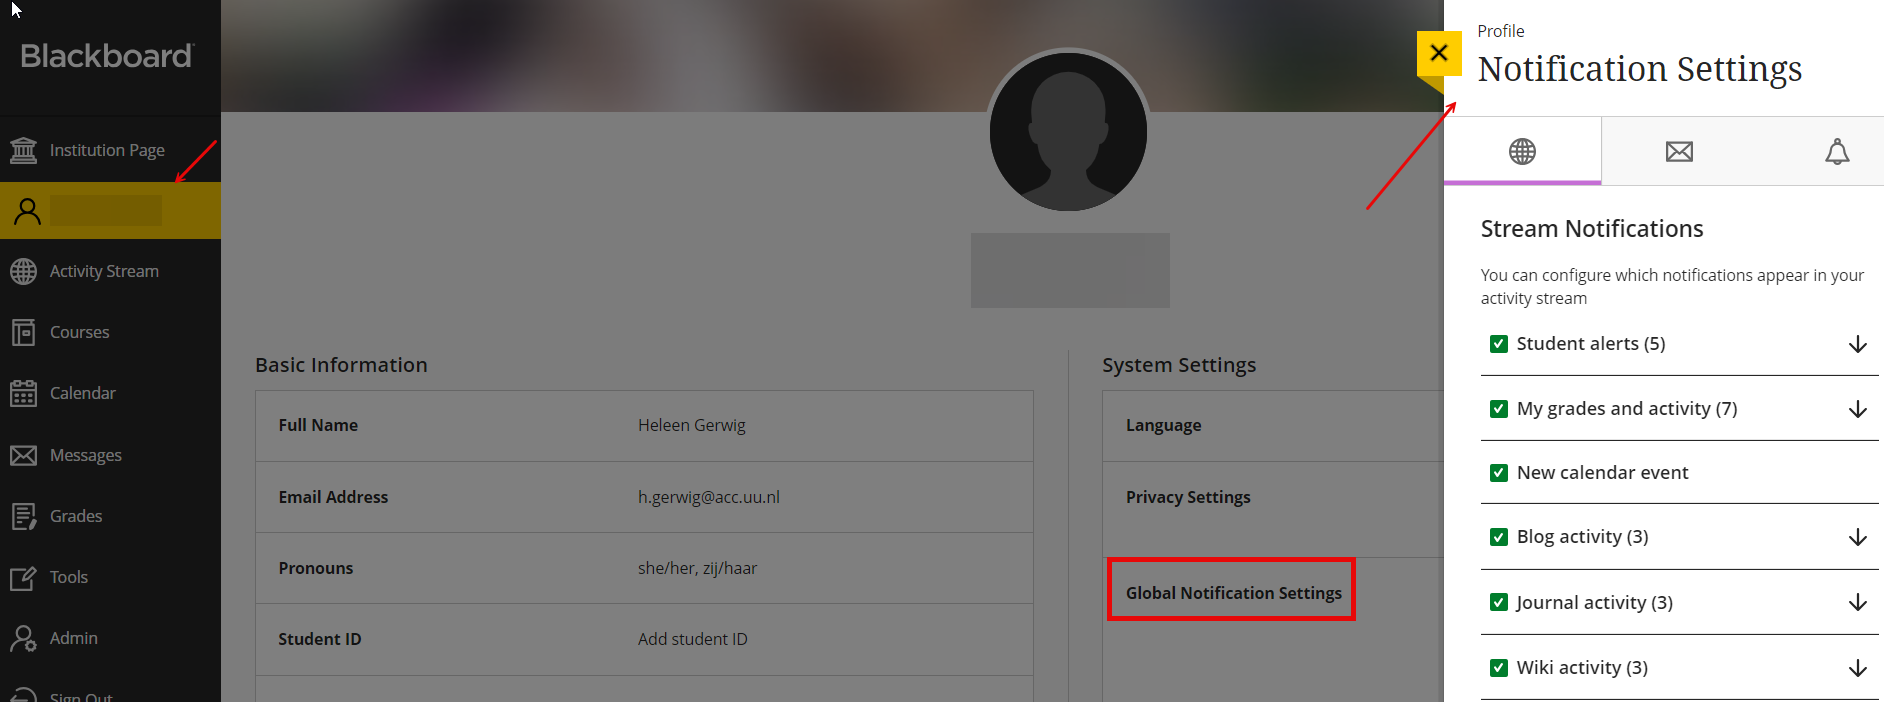
You can choose from Stream, Email and Push Notifications. Choose what you want to have turned on and what not, which notifications you want for the activity stream and which you want to receive by email.
Here you can read everything about setting up your notifications.
- How do I adjust my images for Courses
In the UBN menu, under the ‘Courses’ option, you can upload an image to use as a thumbnail for your courses. This means you can select and upload an image file so that it appears as a small preview of your course. For example, this thumbnail image can help create more structure for your students by giving certain courses the same image. You can read how to do this and in what format you should upload the images under the topic Course Banners on the Blackboard website. Make sure you use royalty-free images.
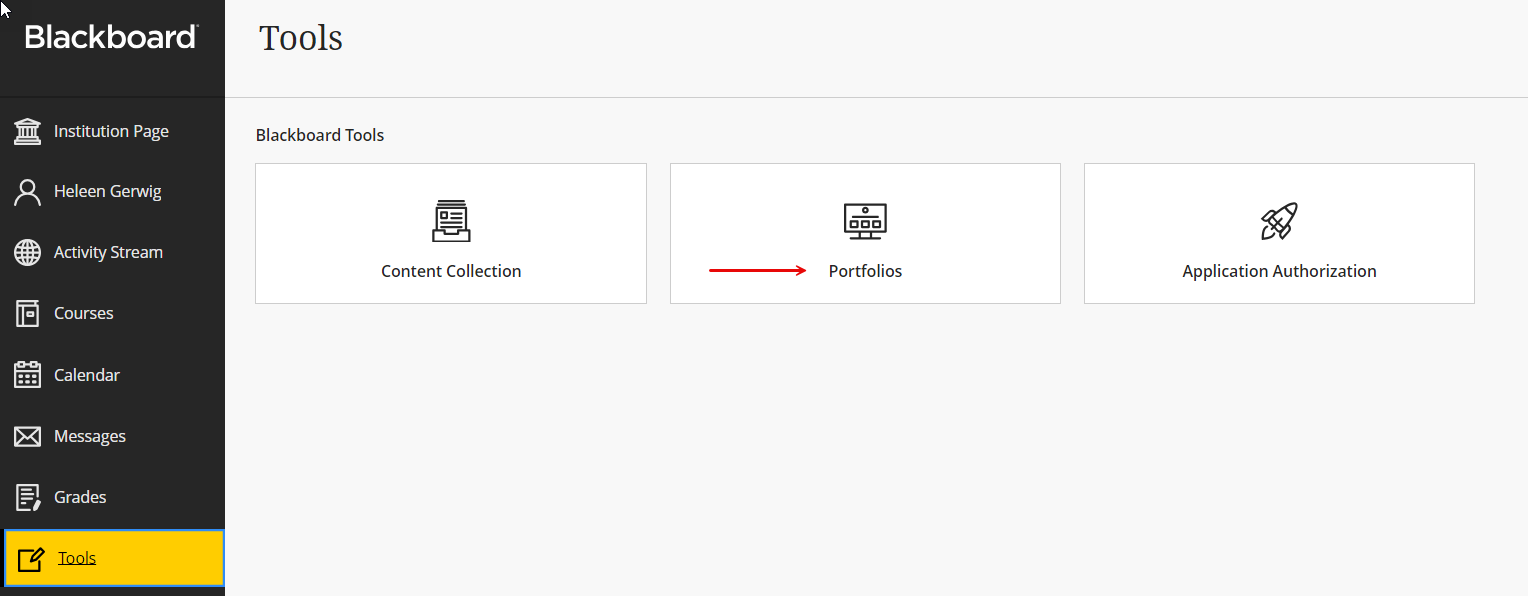
- Where can I find my portfolio?
You can find your portfolio under ‘Tools’ – ‘Portfolios’
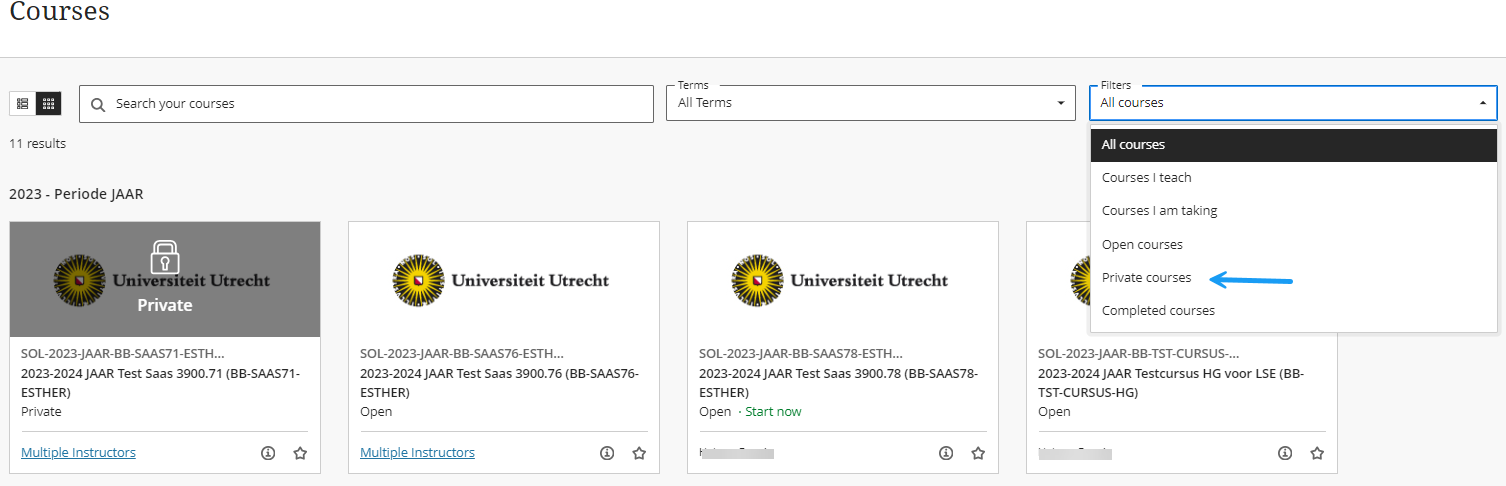
- Why do I see ‘private’ for some courses?
Courses that have already been created but are not yet available to you are now also in your course overview. These courses are now referred to as ‘Private’ and can be recognized by the lock. You can also filter your courses by open and private courses:
- What can I find in the Activity Stream?
In your activity stream you will only find activities that involve due dates. If your teacher does not select a due date, you will not see the activity here.
- What is shown under “Courses”?
Courses contains everything that is currently active and open to the user. We currently do not use start and end dates in BB, so anything open will appear in Courses, similar to how students now see their list of courses under My Blackboard.
Filters such as “Courses I teach” and “Courses I’m taking” are the way to see the difference in the UBN between which course you are an instructor in and which course you are a student in.
You can find, rank, favorite or hide your courses on this page. You can read how to do that here.
To see what has changed, also check this page.
Attention:
With the transition to Ultra Base Navigation there is a change in the way surnames are sorted. The prefixes are linked to the surname. This means that surnames with, for example, “van der Bosch” are sorted by the ‘v’. Unfortunately, there is no other way to solve this within UBN.
Adaptive Release enables you to restrict assignments only to students that are members of certain coursegroups. This is realized via a rule in the section ‘Membership’. If you’ll need to change these coursegroups afterwards, this can surely be done. When you try to remove coursegroups however, it seems to be impossible to delete the last one.
There is a way to delete the last coursegroup in the rule nevertheless. With the use of Adaptive Release Advanced, the rules that are created by Adaptive Release are split into functional parts (criteria). Chose Edit Criteria and edit the criterion named ‘Membership’. Delete the respective coursegroup and submit. Now you will see that the coursegroup finally disappeared.
If you are deleting an assignment for the first time, the Edge browser brings up a question: “The website mentions: the action is final and cannot be undone, delete this item?”. Clicking OK will correctly delete the respective assignment.
If afterwards you will delete another assignment, the question that is associated slightly differs and adds the possibility to click: “Do not allow this page to make more messages”. Beware: if you choose for this option, than afterwards assignments cannot be deleted anymore, you will not receive any message of it and you will have to restart the Edge browser to be allowed again.
Technically it is possible to manually delete enrolled students from a course, but we strongly advise to follow the procedure below!
When students are directly deleted from a blackboard course all information and documentation (like assignments, results, grading, etc.) is lost. Moreover this account will be enrolled again after the next automatic synchronization with OSIRIS which daily occurs twice. The correct way to remove a student from a Blackboard course is to unenroll the student from within OSIRIS.
Note: after removing an enrollment via Osiris, the provisioning script will provoke a disablement of the enrollment in Blackboard (the course enrollment of the student cannot be seen by the student, nor by other students or by the instructor). Because of this disablement, the assignments and other contributions of the student will still continue to exist. Reestablishing the enrollment can only be done through Osiris.
Students can arrange enrollments for courses and minors via students.uu.nl/en/contact/faculty-student-desks.
It is not possible to enroll students in a blackboard course. Enrollments to Blackboard courses are done automaticly by the enrollment of students within OSIRIS.
In emergency cases students can be enrolled in a blackboard course. Only use this possibility in case something went wrong with enrolling and the student needs direct access to the course. Of course the student still needs to be enrolled in the OSIRIS course!
- Go within the course to “control panel”and “users and groups”
- choose users
- click on the “enroll user” option, followed by “find users to enroll”
- search for the user (by browse) or fill in the Solis-id of the particular student(s) en choose by “Role” for student.
- “enrollment availability” is checked “yes”
- Click on [submit]
A ‘Message’ is a message which can only be read within a blackboard course or community. A student has to open the specific course and open the message tool to read it. This communication mode is not heavily used in the UU.
Mail will be send to the regular mailbox of the @students.uu.nl e-mail account. It is not possible to forward a ‘messages’ to an e-mail account.
When creating a course link, the location in the course has to be set in a pop-up screen. When you do not see the item you have just created, use CTRL + F5 to refresh the pop up screen.

When a course is available but can’t be found in the ‘My Courses’ list of the student, the student may not be enlisted in Osiris for this course. This can be confirmed by the Faculty Student Desk. When the Osiris information is confirmed to be okay and more than one day passed since the registration, the student can contact the faculty manager. The contact information can be found at ‘Contact Faculty Helpdesk’.
If a student has been enrolled in a course in Osiris and the course is set to ‘Available’ (See: How do I make my course available?), this student will be included in the copy process that hands over student account data from Osiris to Blackboard and makes their enrollment available in the respective course in Blackboard.
This provisioning process from Osiris to Blackboard runs twice a day, once in the morning and once in the evening, including the weekend. Most of the time, a student will see the enrollment in the Blackboard-course a day after the enrollment of the Osiris-course took place. There are exceptions however, the procedure is different e.g. for the matching student.
The course is probably still unavailable, see Hoe maak ik mijn cursus beschikbaar/available?
Another possibility is, that the course is made ‘Date-Restricted’, and that the current moment is different from the available moments of the announcement.
The creation of courses and the enrollment of the correct people is a fully automated process, originated from the databases of Osiris. This process ensures that for each course in Osiris (except when explicitly stated), a course in Blackboard will be created and that for all students enrolled in the Osiris-course as ‘Student’, Blackboard creates a student for the respective course. All teachers and coordinators registered in Osiris as an “Instructor”, will be enrolled as “Instructor” in the Blackboard equivalent course.
If something is wrong with the course or enrollment, you may undertake several steps:
- It is useful to know the details of the registration of the course in Osiris. This can be found in the Course Catalogue of the University of Utrecht.
- When the course does appear in the course catalog, but the list of teachers is not correct, it is best to contact the Faculty Student Desk. In both cases they are able to correct the information in Osiris, which will result in an update of the information in Blackboard as well. Because this update is realized by an automated process, the changes will only be effective the next day.
- Is the information shown in the course catalog correct but you do not have access? Please contact your Blackboard Faculty Key user. The emailadresses can be found under ‘Support’.
This depends on a setting of the discussionboard. ”Allow file attachments” needs to be set within the settings of the specific discussion board. At creating a general discussion board it is allowed per default. At creating a group-discussionboard the setting is default off. Changing this settings can be done as follows:
- Enter the group and discussionboard by Control Panel > Users and Groups > Groups.
- Click on the group name
- Click on the Group Discussion Board.
- Click on the chevron next to the name of the Discussion board and select ‘Edit’.
- Navigate in the appearing screen to section ‘Forum Settings’ and check the box at ‘Allow File Attachments’.
- Click on Submit
Yes, this is possible. teachers with the role “instructor” can always add other teachers and give different roles to this teacher.
- Go to “control panel” and “users en groups”
- click on “users”
- Click on “enroll user” and “find users to enroll”
- Fill in the Solis-id of the teacher at “username” and select “instructor” at Role.
- Or, click on the “Browse…” button to search for a user.
There is a possibility to search for name and e-mail address. - select “Yes” at “Enrollment Availability”
- Click on “submit”
Every teacher with a Solis-id for Utrecht University can be enrolled in a course following the steps mentioned above.
Beware: Osiris is the base for the setup of the course in Blackboard! Unlike with students, Instructors will be retained in the course, also when they’re not available in the Osiris-course. We strongly advise to create the enrollments from within osiris.
Guest teachers
Teachers who do not have a Solis-id can be enrolled as a guest teacher to a course..
A request to create a guest account can be submitted at the blackboard administrator of the faculty. The administrator will enroll the guest account in the desired course. The E-mailadresses of the responsible blackboard administrator can be found in blackboard under ‘Support’.
It is possible to place multiple links to various files in an item on a content page. This goes as follows:
Part I: place the files in the content collection of the course via a zip file:
- Make a zip file of the files that you want to place on Blackboard. (To create a zip file, do the following: 1. Select the files you want to put in the folder by holding down the ctrl key. 2. Release the ctrl key and click your right mouse button. 3. Choose from the menu that appears, “Copy to …” and choose “Compressed (zipped) folder.” The files will be in one folder together.
- Go to the Content Collection in the course by clicking on the name of the course (see marked part in image).
- Create a folder where you want to place the files in the content collection (not necessary, but provides an overview). You can do this by clicking on ‘Create content folder’ (see marked part).

- Open the newly created folder to place the documents from the zip file here. Click on upload and choose ‘Upload Zip Package’.
- Then click Browse Computer and select the zip file you just created. Click Submit.
- The files from the zip files are now extracted in the content collection.
Part II: place the files (links of the files) in the course, visible to the students.
- Go to the page where the links to the files should be placed.
- Click on ‘Build Content’ and choose ‘Create Item’ in the drop-down menu.
- Give the item a name and descriptions about the documents.
- Click on ‘Browse Content Collection’.
- Check all files that must be placed.
- Click Submit. The files are now placed on the page.
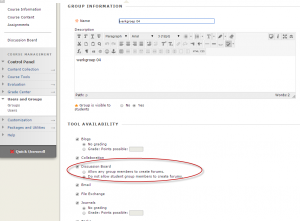
A discussionboard is an instrument of communication that can be used by all members of a course, or can be allocated to coursegroup members only.
Firstly, the coursegroups have to be made. After that, you will checkmark the discussionboard as an attribute to the course.
How do you restrict access to only a specific group?
- Go to the control panel to “Users and Groups” and click on “Groups”.
- Create the group and make sure the checkbox at “Discussion Board” is checked:

If your course both has a full-time and part-time version, this will not be clearly visible in ‘My Courses’ because there you will see the same course name. This problem can be solved by having the BB course_id also shown: this ID will show a V or a D.
This can be done by clicking on the ‘cog’ button in the upper right corner. Here you can specify per course if you also want to show the BB course_id.
The image below shows the resulting BB course_id and the cogwheel:

Below the needed checkmarks:
The function “Discussion Board” is most used when you want students to discuss with each other, for example due to a college or workgroup. Within the manual Discussion Board, an explanation is given of how discussion boards can be created. If you want students to discuss in groups, it is wise to first define the group and then to create the discussion board(s).
If you created groups, students are able to exchange files from within a discussion board without a notification. If you want to allow this to students, you’ll activate the tool ‘File Exchange’. This tool is available exclusively in groups! It is important to clearly explain the purpose of the tools to the students, so that they will use them properly. E.g. it is better to use File Exchange to only exchange files, and not the Discussion Board.
For more information on working with groups and creating discussion boards a seperate manual is available.
Java is less and less supported by browsers. Blackboard supports this development and reprogrammed Java-based functionality to HTML 5 code. Since the last update, Blackboard removed the Collaborate tools, which included the Chat and Virtual Classroom. These tools were reliant upon Java to function. The Collaboration tools were rarely used within the UU. The Multiple File Upload cannot be used anymore, which was also a Java based functionality.
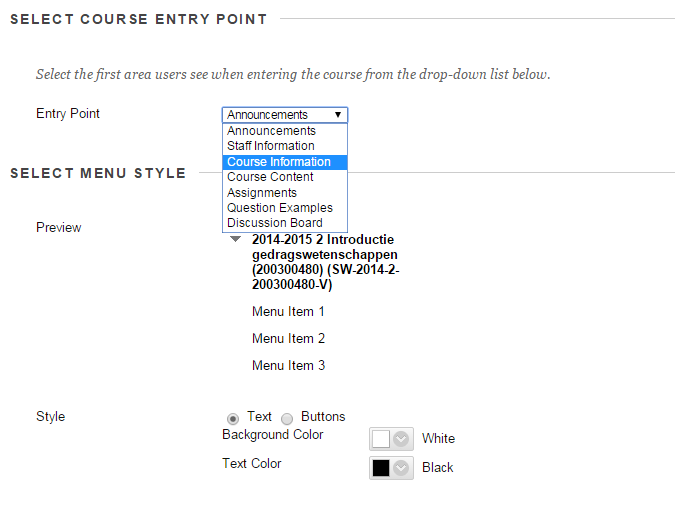
Yes, by setting the Course Entry Point. Please be advised to follow the Template of Utrecht University. Within this template the announcement page is the first page visible to students..
You can find the Course Entry point by Control panel > Customization > Teaching style:
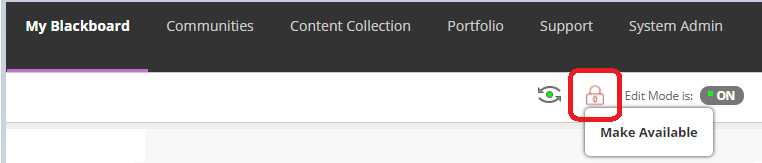
Click on the lock icon at the top right and choose Make Available:
Or in the Control Panel go to” Customization ‘and’ Properties’ and then at ‘Set Availability’ choose ‘Yes’ (circled in red below). Now this course will be available to students enrolled in the course. As long as the course is not made available for those students it will not appear in the “My Courses list on the” My Blackboard’ tab.
